Pi-hole in a Docker Container on a Raspberry Pi

While I was disappearing down a rabbit hole investigating unbound as a DNS Privacy server, I came across Pi-Hole – A black hole for Internet advertisements.

I’ve always used uBlock Origin for ad blocking but that is a per client thing which is a bit of a hassle.

Pi-hole provides ad blocking for all clients on the network, seamlessly.  I just configure DNS on each client, via DHCP, to point towards the Pi-Hole server.

Obviously, I love Docker so it’s in a Docker Container on a Raspberry Pi.

Currently, I’ve sacrificed DNS privacy but I’ll work on that later in terms of getting Pi-hole to send all DNS queries through my own DNS server.

This is how I implemented it.  Obviously, these aren’t detailed instructions but more of a reference to jog my memory if I need it!

********************
Note: Substitute the IP address of the host that the Container is running on for ${IP} and ${IPv6}
********************

docker run -d \
    --name=pihole \
    --hostname=pihole \
    -p 53:53/tcp -p 53:53/udp -p 80:80 \
    -e ServerIP="${IP}" \
    -e ServerIPv6="${IPv6}" \
    -v pihole_data_1:/etc/pihole/ \
    -v pihole_data_2:/etc/dnsmasq.d/ \
    --restart=unless-stopped \
    pihole/pihole:v4.0_armhf


Raspberry Pi Docker Container to send all LAN DNS requests to Cloudflare’s 1.1.1.1 DNS over TLS

I wanted to implement this on a Raspberry Pi that I have running Docker.  However, I wasn’t able to find an image in Docker Hub for the ARM architecture that the Raspberry Pi uses so I made my own based on the x86-64 image, here.

  • Place the Dockerfile and unbound.conf in the same directory.
  • Docker file:
FROM arm32v6/alpine:3.7
EXPOSE 53/udp
RUN apk add --update --no-cache -q --progress unbound && \
    rm -rf /etc/unbound/unbound.conf /var/cache/apk/*
COPY unbound.conf /etc/unbound/unbound.conf
ENTRYPOINT unbound -d
  • unbound.conf:
server:
  verbosity: 0
  use-syslog: no
  qname-minimisation: yes
  do-tcp: yes
  prefetch: yes
  rrset-roundrobin: yes
  use-caps-for-id: yes
  do-ip4: yes
  do-ip6: no
  interface: 0.0.0.0
  access-control: 0.0.0.0/0 allow
forward-zone:
  name: "."
  forward-addr: 1.1.1.1@853
  forward-addr: 1.0.0.1@853
  forward-ssl-upstream: yes


  • Build the Docker image:
docker build -t itinnovations/cloudflaretlsdns:latest .


  • Start a container as a daemon from the above image:
docker run -d \
  --name=CloudflareTLSDNS \
  --restart=unless-stopped \
  -p 53:53/udp \
  itinnovations/cloudflaretlsdns


  • Configure all clients to point to the IP address of the Docker Host for DNS.

EDUP 802.11n Mini Wi-Fi Adapter Sleeping


I bought some EDUP 802.11 N Mini Wi-Fi Adapters from China.  They’re cheap and do a fine job plugged into my Raspberry Pi’s.

However, by default, they always go to sleep which makes it difficult to connect to them via ssh etc.  To fix this, here’s what I did:

To identify the USB WLAN Adapter I did the following:

$ lsusb

Bus 001 Device 004: ID 0bda:8176 Realtek Semiconductor Corp. RTL8188CUS 802.11n WLAN Adapter
Bus 001 Device 003: ID 0424:ec00 Standard Microsystems Corp. SMSC9512/9514 Fast Ethernet Adapter
Bus 001 Device 002: ID 0424:9514 Standard Microsystems Corp. 
Bus 001 Device 001: ID 1d6b:0002 Linux Foundation 2.0 root hub

Then:

$ lsusb -t
/:  Bus 01.Port 1: Dev 1, Class=root_hub, Driver=dwc_otg/1p, 480M
    |__ Port 1: Dev 2, If 0, Class=Hub, Driver=hub/5p, 480M
        |__ Port 1: Dev 3, If 0, Class=Vendor Specific Class, Driver=smsc95xx, 480M
        |__ Port 5: Dev 4, If 0, Class=Vendor Specific Class, Driver=rtl8192cu, 480M

From that I was able to derive that the WLAN adapter was using the rtl8192cu drivers.

A bit of Googling later, I was able to disable power management on the Wifi adapter, like this:

sudo nano /etc/modprobe.d/8192cu.conf

Add the following lines:

# Disable power management options
8192cu rtw_power_mgnt=0 rtw_enusbss=0

Reboot…

Run:

cat /sys/module/8192cu/parameters/rtw_power_mgnt

It should return 0 if the power management is off.

Bask in the glory of your WiFi adapter that stays up all the time 🙂

Check or change the Timezone in Debian

To see or change what timezone your Debian system is configured for:

dpkg-reconfigure tzdata

More detailed information is available in the Debian Wiki

More specifically, I used this in a setup of HypriotOS, a minimal Debian-based operating systems that is optimised to run Docker on ARM devices. In this instance it was an old Raspberry Pi Model B running NodeRed in a Docker Container.

I needed to get the time in the Docker Container to match the time on the host.  Achieved, as below, where /etc/localtime on the host is mapped to /etc/localtime in the container when it is created.

docker run --restart=always -p 1880:1880 -d --name nodered -v /etc/localtime:/etc/localtime:ro -v node_red_user_data:/data nodered/node-red-docker:0.17.4-rpi

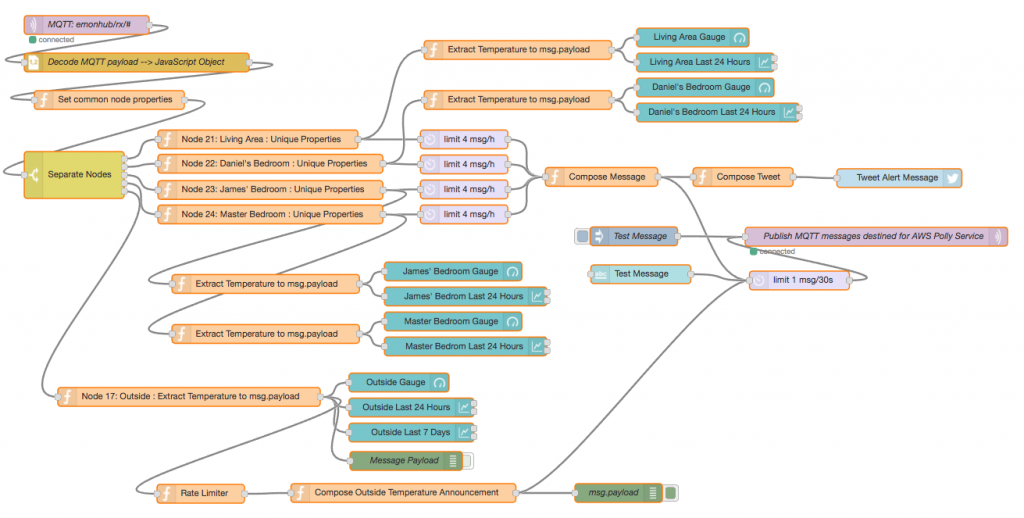
I have used NodeRed to subscribe to messages from an MQTT service I have running that publishes various messages from various nodes around our house.  The NodeRed code listens for some of these messages and uses the AWS Polly Service to convert them to speech and read them out to us.

There’s a sample of the speech, below, as well as screen shots of the NodeRed flows.

Get Spell Checking Working in Libre Office on a Raspberry Pi

Spell checking never seems to work, by default, in Libre Office on a Raspberry Pi.

To get it working:

# Go to:
https://extensions.libreoffice.org/extensions/english-dictionaries/

# Click on the Current Release or go to the below URL which
# is current as of now!
https://extensions.libreoffice.org/extensions/english-dictionaries/2017-01.01

# Download the .oxt file

# In Libre Office go to Tools / Extension Manager

# Add the .oxt file

# Spell checking now works!


Mount a Network Drive on a Raspberry Pi

This has been tested on Jessie with the PIXEL Desktop. I haven’t tested it in previous versions.  Substitute the IP address in fstab and the share name, as appropriate!

# Make a directory in /mnt
sudo mkdir /mnt/DataDisk

# Edit fstab:
sudo nano /etc/fstab

# Add a line with a similar format as below
//192.168.178.240/DataDisk /mnt/DataDisk cifs guest,iocharset=utf8,_netdev,x-systemd.automount 0 0

# Reboot and check that things mount OK after a reboot
sudo shutdown -r now